Mount VHDX into WSL on startup
I use quite a lot of VHDX files on my computers, it allows me to create separate drives for different customers
and to lock drives down when they are not in use (with the help of BitLocker), further, you can easily move a VHDX drive in case
you need to change to a new computer!
When it comes to WSL, I have had big issues with disks that goes corrupted and makes me loose work, something which
is quite annoying even though most of the stuff I work with is pushed to a git remote.
So… to remind myself on how to do it, I thought I’d write a short post on how to create a vhdx file, format it and then set up automatic mounting
into WSL2 to allow storing data on a disk which is not the default WSL vhdx file.
This post focuses on Windows 11 and WSL2, this is because the updates to WSL required to mount disks like this does not exist for Windows 10 nor.
Initialize the VHDX
The first step is to create a virtual drive. This can be done with the help of HyperV or through PowerShell:
New-Vhd -Dynamic -SizeBytes 20gb -BlockSizeBytes 1mb -Path C:\path\to\my-new-disk.vhdx
This will initialize a new dynamic disk which will grow up to 20gb, the BlockSizeBytes param tells the VHD to increase size 1mb at a time, this can be changed to your liking, but its the default in HyperV.
Depending on the user whom created the disk, you might have to change the permissions in the properties of the VHDX file to allow your user to do everything.
The new disk is not formatted, so we need to mount it into wsl to allow our linux distro (in this example Ubuntu) to format it.
So on the first mount, we use
wsl --mount --vhd C:\path\to\my-new-disk.vhdx --bare
Start wsl and check the disks with lsblk.
NAME   MAJ:MIN RM   SIZE RO TYPE MOUNTPOINTS
sda      8:0    0 388.4M  1 disk
sdb      8:16   0     8G  0 disk [SWAP]
sdc      8:32   0    20G  0 disk
In my case, the disk I want to use is sdc. This might be hard to know if you have multiple disks mounted, so you might want to unmount
the disk, run lsblk and then diff the output when re-mounting.
When you know which disk it is you want to format, it’s time to format it.
Depending on filesystem, there are a few different commands, but in this post, I’ll use ext4.
sudo mkfs.ext4 /dev/sdc
After this is done, the disk will be formatted and you should unmount it from wsl:
wsl --unmount --vhd C:\path\to\my-new-disk.vhdx
If you don’t care about automatically mounting the disk, and just want to do it manually each time, you can just use the following command:
wsl --mount --vhd C:\path\to\my-new-disk.vhdx --name <disk-name>
And then locate the disk in /mnt/wsl/<disk-name> inside your wsl installation.
Automount the VHDX
For this part, we will create a small script and make it run with the TaskScheduler, this is quite a simple thing to do but I for one have not used the Scheduler very much, so it might be new for you as well.
The script will run the mount command and a simple mount-wsl.cmd file will do just fine.
Create the file in a location that feels good and add the following snippet:
wsl --mount --vhd C:\path\to\my-new-disk.vhdx --name <disk-name>
If you got more disks than one, just add the same line with another disk name and path.
Next up is the scheduler, which you can find by pressing win + r and typing in taskschd.msc.
Right-click on the Task Scheduler Library and select Create Task.
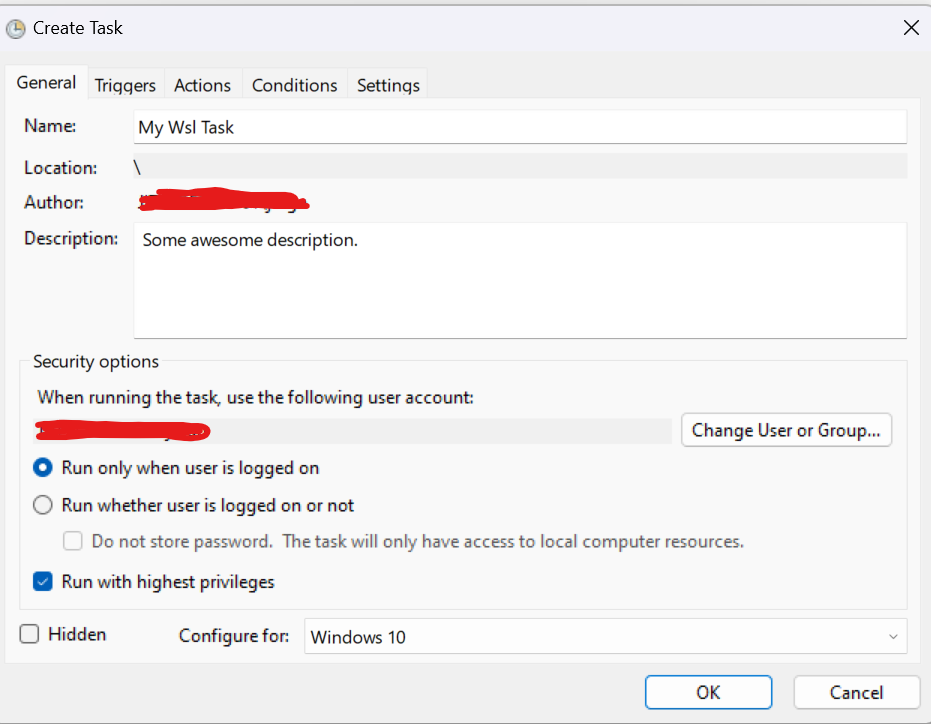
Name the task to an appropriate name and add some type of description to remind you of what it does (not like we visit the scheduler that often!).
The following boxes should be checked under the General tab:
- Run only when user is logged on
- Run with highest privileges

The next tab to go to is the Trigger tab, here you should press New to create a new trigger.
We want the trigger to happen on login for our specific user, so change the Begin the task dropdown to At log on
and toggle Specific user.
Press Ok and the trigger will be created.

The final thing we need to do is to create the action that will be triggered, this is done in the Action tab.
The action to use is Start a program (which is the only non-deprecated action), and the Program/Script we want to run
is our mount-wsl.cmd script.
Select it with the Browse button and press Ok, no arguments needed.
If your on a desktop computer, you’re done. Save the Task and press Run to see if it works as intended.
If your on a laptop, there is one last thing you might want to change:
In the Conditions tab, there are two checkboxes:
Start the task only if the computer is on AC power and Stop if the computer switches to battery power.
It’s likely that you wish to change those two, seeing the task in question is very low power and a fire-and-forget task.
And that’s it.
Final words
This post is mainly intended as a reminder to myself (as I had to re-do it on a new computer just a bit ago), while it could be useful for others as well, so hope you enjoyed it!