
Imagick for php, compiling it from source
Update: Since 2021-06-07 (3.5.0 stable) imagick extension for php8 is available for windows as well. This post is still relevant though, as some of us still prefer to build extensions for other versions of imagick etc :)
Oh noes, imagick doesn’t work!
![]()
That’s what I thought, pretty much, as I wanted to migrate a website to php8 (or at the least try to!).
The Easiest way to fix this is usually to just download it from pecl and go nuts, but at this time, there is no php8 binaries
on pecl for php8 imagick (from what I gathered, it doesn’t work with php8 yet?!).
So… how to fix..?
Well, first thing that one would check, is to see if someone else have compiled it already. I found a couple of links to file
stores which didn’t work or made me feel quite uncomfortable downloading files from…
So I thought that I’d compile it for myself.
Now, if my work computer was running linux, this would be a walk in the park, really, you just install a couple of packages and recompile php and it’s all done. But my computer is actually running Windows! So… now I had to figure out how to compile PHP extensions on a windows machine!
This is not the most easy task to be honest. I found a walkthrough on how to compile php and extensions on the php site.
It helped a bit, but seeing imagick is not a standard extension, it isn’t just a quick compilation away.
So, after having to struggle through a jungle of bad (or rather, none) documentation and after trying to “translate”
buildscripts for linux to windows, I finally got it working!
Due to the time I spent, I thought I’d write it down, both for my self (for future reference) and for anyone else who might
need to do the same thing in the future!
Where to start
When you need to compile something you will need a few things before even being able to start with it. One thing I recommend
is to download visual studio (or at the least the build tools) so that you have all the c++ and c compilers and libraries that
are needed.
If you intend to build ImageMagick (that is, the actual program, not just the php extension) you should also
make sure that you install the windows sdk and latest MFC libs from the VS installer.
When all that is done, we need to create a base folder for building everything.
My C: disk is sacred, so I used my secondary disk, the D: disk!
To make everything simple, we will say that my base directory was D:\php-src.
In this directory we aught to do a few things to make it possible to even start working on this, the first ting is to
install the PHP SDK tools.
The PHP SDK tools are used to build PHP source on windows (I’m sure it can be done in other ways, but this seems like an easy enough way).
You can find the source to the sdk tools at https://github.com/microsoft/php-sdk-binary-tools.
When you got the zip file from the releases at github or you have decided to clone the repo, you will want it extracted in the php-src directory.
To make it easy, I used D:\php-src\sdk for my directory.
You should now enter the directory in a terminal (preferably powershell or something, but I think anything will work) to allow the SDK tools to initialize the build directory structure.
cd D:\php-src\sdk
bin\phpsdk_buildtree.bat phpdev
This will create a new directory in D:\php-src\sdk which will be named phpdev. Inside the php-dev directory you will find a few folders.
Depending on your setup, you will have to locate the VS version (or VC) and the Architecture of the computer you are building on,
in case you use a standard setup and latest VS, you will have the path D:\php-src\sdk\phpdev\vs16\x64\.
That’s where we aught to put the PHP source code.
When building the extension, you should make sure that the php version matches the one that you use yourself. I think that
build versions (or rather, patch versions in SEMVER) is okay to ignore, but I’m not fully sure about this. So to be safe, try to locate
the source package which corresponds to your version (maybe even update your own version while at it!).
You can find the php source at the same place where you download the actual binary packages: https://windows.php.net/download/
When you got the source at your given path (D:\php-src\sdk\phpdev\vs16\x64\php-8.0.2-src or similar) you are ready to install the dependencies for
the base libs.
Open a new shell and enter the sdk directory.
From there, run the sdk bat file that corresponds with your vs version and arch (e.g., phpsdk-vs16-x64.bat) and you will enter a new shell.
While inside the shell, enter the php-8.0.2-src directory (the one containing the actual php code) and run the following command:
phpsdk_deps -u -b 8.0
This should create a few directories in the directory above where you currently are located. You may leave the php-sdk shell with the exit command.
Install ImageMagick
If you already have ImageMagick installed, you can skip this part.
If you wish to install ImageMagick from source, you can skip this part as well and head over to the next part.
But if you don’t, head over to the page and download the executable that you want (in my case it was the ImageMagick-7.0.11-1-Q16-HDRI-x64-dll.exe) and install it at the wanted location.
When it is installed, you need to add a couple of environment variables to make sure that ImageMagick can be found.
Grab the path where you installed the binaries (in my case D:\Program files\ImageMagick) and add it to your PATH environment variable.
Also, while at it, add the variable MAGICK_HOME with the same path as value.
Now, this will allow the linker to find the DLL’s that is needed to allow it to build the extension later on.
Get the source!
It’s not enough that we have the ImageMagick application installed, we actually also need the source and build it!
Head back over to the imagemagick page and download the sourcecode (https://imagemagick.org/script/install-source.php) and extract it in the php-src directory (the one directly under D:).
You now have to build the ImageMagick pre-configuration executable, which is a visual studio project located inside the D:\php-src\ImageMagick-<version>>\VisualMagick\configure directory.
Open it in VS and allow it to upgrade the code to your version of the SDK if it asks for it.
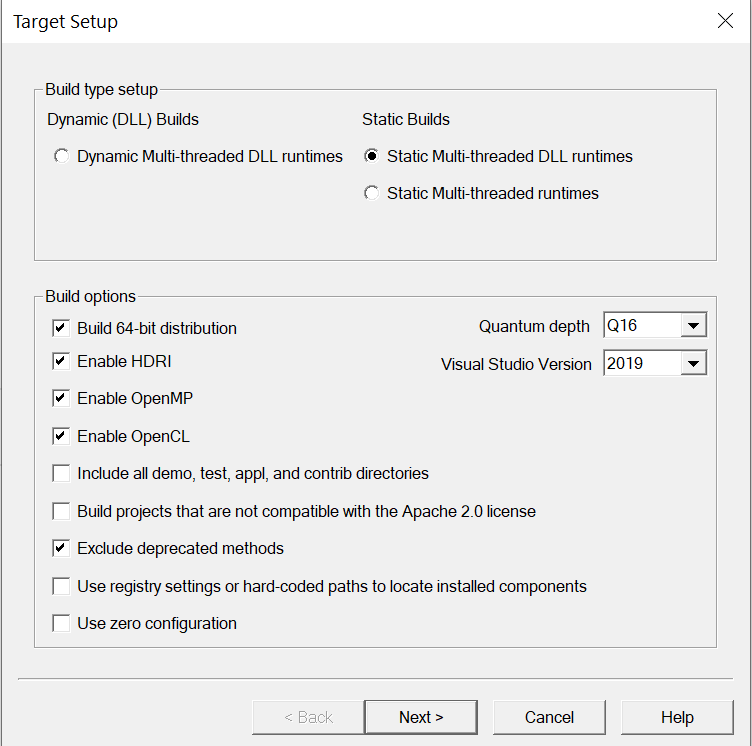
With that done, build the solution and run it (can press the build and run button even) and after a short compilation time, it will open a prompt from which you can set up the
build directories. Make sure you tick the correct boxes in the Target Setup step, you will likely want the Static Multi-threaed DLL runtimes
(which, if you don’t have the ImageMagick program already installed, you will need), then you need to tick the Build 64-bit distribution if that is what you use.
Further on, you may configure the QD to fit the one you installed earlier (if you did), which in my case was the Q16 version.
Press next and it will allow you to set up where the files and dlls should be installed.
If you didn’t install the ImageMagick binary, anything that is generated in the future \bin\ dir, (which is the executables and the dlls) will have to be moved to your
desired installation path and then added to your path variable and MAGICK_HOME variable for it to be as we wish.
Don’t change the paths if you don’t really have to and just press next.
The configuration will create a new set of folders for you and a new Visual Studio solution, all located in teh VisualMagick directory.
Open the solution and build it all (Build solution).
When this is done (could take a few minutes), you will have successfully built ImageMagick from source (yay!).
Even if this could feel like a great success, we still have work to do, sorry…
Inside the VisualMagick directory, we will now have a directory that we aught to use in the future configuration of the PHP source: lib.
This is the library files that are required for the compiler to actually build the source, which is quite important.
Inside the ImageMagick directory (which is in the same directory as the VisualMagick directory) we will also find some stuff that we need, these are the
header files which we will need to include in the build as well.
The paths should be something like:
D:\php-src\ImageMagick-<version>\VisualMagick\lib
D:\php-src\ImageMagick-<version>\ImageMagick
The extension
With ImageMagick installed, we need to get a hold of the imagick extension source. Luckily, it’s available on github.
Get the source (clone or pick one of the zipped files under releases) and create a folder in the D:\php-src\sdk\phpdev\vs16\x64 directory. Name it pecl and
extract the imagick source inside it (imagick should create a new directory, if it doesn’t just create a new imagick directory inside the pecl directory and move the files there).
Time to build!
Again run the php-sdk tool and re-enter the directory where the php source was extracted (D:\php-src\sdk\phpdev\vs16\x64\php-src)
we now have to set up the configuration script for php, this is done with the: buildconf command.
Buildconf generates a few files which allows us to run the configure command, this command can be changed to build more (or rather in this case less) of
the php extensions and such that we need.
In this case, we don’t need anything but the imagick extension, so when we configure the build we disable everything else.
If you use a none-thread-safe version of php (yes it is important that it is compiled against the same target), you have to add the flag
--disable-zts somewhere in the configure command. Other than that, the following would suffice:
configure --disable-all \
          --enable-cli \
          --with-imagick=shared \
          # --disable-zts \ # Uncomment for none-thread safe!
          --with-extra-includes="D:\php-src\ImageMagick-<version>\ImageMagick" \
          --with-extra-libs="D:\php-src\ImageMagick-<version>\VisualMagick\lib"
This will disable all extensions that we don’t care about, it will also enable the imagick extension as a shared DLL, something we really want, and as well point the compiler to the given includes and libs that we need.
After the configuration is completed, follow the advice of the terminal and run the nmake command.
What now?
Now, after nmake have finnished compiling our project, we can enter the <arch>/Release<-TS> directory, inside this you will find the php_imagick.dll file that you need!
Add it to your php ext directory and enable it in the .ini file with a:
[Imagick]
extension=imagick
run php -m and make sure that the imagick extension is a part of the output.
That’s it!
Final words
Compiling the extension was a lot more trouble than I actually thought it would be from start. Now..
it not that bad and it was mostly due to the fact that I had basically no information on what parts where needed
for the extension to compile, that is… a lot of trail and error!
I got it working, and hopefully I won’t have to bother with this again.
If you use windows for PHP, I would for sure recommend to just use a docker image or even PHP via WSL or similar. It’s easier
and works pretty much right away!
Hope the small writeup helps someone!