
(Revisiting) Certificate Authority with CFSSL
This post is a revisit of a tool which I wrote about in “Certificate Authority with CFSSL” back in early 2019.
Cfssl is a great tool for setting up a basic certificate authority. When I wrote my first post about it, I was fairly
new to the concept of SSL/TLS and certificates, I researched cfssl to find an easy way to generate certificates for
a kubernetes cluster I was working with.
Since then, I’ve tried a few different tools which does similar things, Smallstep CA and Hashicorp Vault are two tools
that I use in one or another way, Smallstep CA is great as a server and Vault is a monolith, so, when it comes to locally
generating certificates, I still find that I fall back to using cfssl.
So, why would I write another post about cfssl? Well, it’s been over 3 years since I wrote my last one, and it seems
to still gather quite a lot of traffic, so I think that it could be useful both for me and for potential readers to
get a new, up-to-date post about the tool!
The CFSSL version used in this post is v1.6.3
What is CFSSL?
CFSSL is a toolkit built by Cloudflare, released in 2014.
It’s intended to be used to easily create, sign and serve TLS certificates from a small application which can be ran both locally and as a server (rest-ish json api).
The program is written in Go, which makes it easy to build yourself, or just download from GitHub for
most OS:es and architectures.
I personally prefer to run it as a docker container and use one of my own creations (shameless plug!).
The program have been used by cloudflare to generate their certificate chains, so from a “is it tested?” perspective, it feels quite sturdy.
How does TLS certificates work?
Each TLS certificate consists of a public and a private certificate. The certificates can be “signed” by an authority, which makes
computers and other devices able to identify who issued the certificate and trust them (if they trust the root).
Generating a certificate without getting it signed makes it as much a certificate as if its signed, but each device which wants to
trust it will have to add it to their internal trust store.
So, the best way is to have a root certificate, which is made to sign other certificates, which can be added as a trusted root
hence all certificates signed by it will be as well.
When we build a certificate “chain”, it’s usually a good idea to create the root on a device which have no access to the internet, the device can then be destroyed (after creating an offline backup of the root and a bunch of child-certs) to keep the root as safe as possible.
There are hardware devices (HSM / Hardware security modules) which can be used to create a certificate more securely, but they are quite pricey and using a raspberry pi-zero or similar would probably be a lot cheaper if you intend to destroy it or stove away the raspberry after generating the certificate.
Each intermediate certificate will be able to create certificates as well, it’s sometimes even worth generating intermediates from the first intermediates, to create
a bigger chain and allowing you to easier rotate the certificates further down the chain if needed.
The certificate at the end of the chain is usually called a “leaf” certificate.
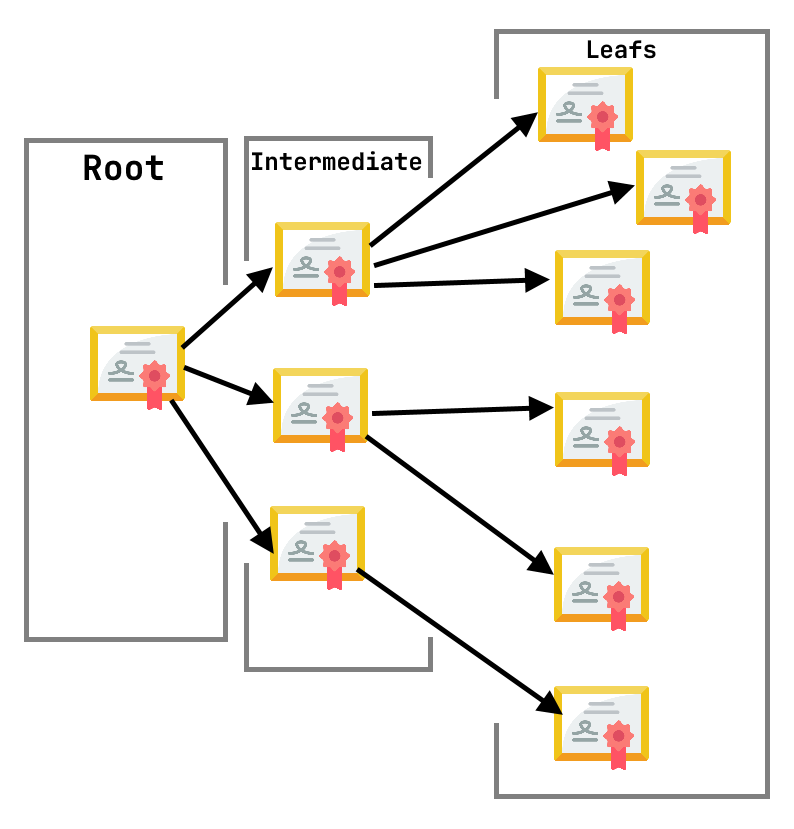
Certificate icons created by Smashicons - Flaticon
Installation
To even start using CFSSL we aught to install it. There are (as said earlier) multiple ways to install it, while, if you have go installed (whichever OS you use), you can get the latest version with a simple
# Newer go versions
go install github.com/cloudflare/cfssl/cmd/...@latest

# Older go versions
go get github.com/cloudflare/cfssl/cmd/...
That command will install all the tools included in cfssl, which might not be needed for your case.
Generating the root
If you are just testing the commands and want to see what happens, its totally okay to do it on your local computer, but if you intend to use the root certificate - that you are about to create - for more critical things, be sure to do it on a computer which is offline and won’t be connected to the network again. A production root certificate should be secure, and having it on a machine exposed to the net is not a good idea. If your root certificate runs off on the internet, you will have a HUGE headache and a lot of work to do to rotate all your certs!
To generate a new certificate with CFSSL we need to create a json file with the data that we want the certificate to have.
root.json
{
    "CN": "Jitesoft CA",
    "key": {
        "algo": "ecdsa",
        "size": 384
    },
    "CA": {
        "expiry": "87660h",
        "pathlen": 2
    },
    "names": [
        {
               "C": "SE",
               "L": "Lund",
               "O": "Jitesoft",
               "ST": "Skania"
        }
    ]
}
The above json includes the required data for a ECDSA root certificate for the Jitesoft CA.
The CN property defines the certificates “common name”, the name of the “root”.
Depending on the usage, the CN should have different names, but in my case, I want my top-most certificate to be called
my company name and CA to make it known that it’s my certificate authority certificate.
The CA clause allows us to define the pathlen for the certificate as well as the expiry lifetime.
Default expiry for cfssl CA’s is 5 years, which might be enough, the example above uses 10 years though.
The pathlen variable indicates how many intermediate certificates that can be created in a hierachy below,
0 means that the CA can only sign the leaf certificates, 1 level of intermediates can be created, 2 that the intermediate
certificates can create sub intermediates and so on.
In a certificate used for a webserver, you would set the primary domain as the CN, while you would add a
hosts property (an array) with any alternative names (SAN) to make sure that the certificate is bound to the
specific domains only. But in the case of a CA, we rather want a generic name than a domain.
The key property defines what type of key it is we want to generate, in this case, I have decided that my certificate
should be a ECDSA key with the size of 384 bits.
The final property, names (subject names) gives anyone viewing the certificate a hint of the owner of the certificate.
C = Country (ISO 3166-2 code), L= Locality, O = Organization and ST = state.
If wanted, you may also include OU (organizational unit name), as well as E (email).
RSA or ECDSA
RSA and ECDSA are two algorithms which are quite commonly used for certificates, RSA is quite a lot older and well tested,
while ECDSA generates a lot smaller files and makes use of something called “Elliptic Curve Cryptography” (ECC).
ECDSA (or rather Elliptic Curve Digital Signature Algorithm) is a lot more complex than RSA (which instead of the curve makes use of prime numbers).
One issue with choosing an ECC algorithm is that there are software that does not “yet” (after 15+ years) support ECC algorithms. So you should choose an algorithm which is best suited for you to use and especially a size on the root which makes it secure enough (I would recommend using 2048 (or rather higher) with RSA and 384 and over with ECDSA).
The lowest RSA size which CFSSL will accept is 2048 and the highest is 8192, while it accepts 256, 384 as well as 512
while using an elliptic curve algorithm.
As of writing, the RSA and ECDSA algorithms are the only ones supported.
Create the certificate
To create the certificate from the json data we created we invoke the
cfssl gencert command.
cfssl gencert -initca root.json
Now, doing this will create a few values and output it to STDOUT in a json format, but by using the cfssljson tool
we can parse it out into a set of files instead:
cfssl gencert -initca root.json | cfssljson -bare root
The gencert command tells cfssl that we want to generate a new certificate (keys and sign request) and by using
the -initca option we also tell it that the certificate will be used for a certificate authority.
If you run the ls command you should now find the following new files in the directory: root-key.pem, root.csr and root.pem.
The root.pem is your public key, this can be shared and uploaded everywhere as it’s not a secret (rather the other way around),
for a client to validate your signed messages, the certificate needs to be known, and this is done by “trusting” the public key.
The root.csr will not be used with the root certificate, as in this example, we don’t use another CA to sign our certificate.
The root-key.pem is a lot more critical that it does not slip out of your hands. This is the key which will be used to “prove”
that your CA is the CA actually signing the other certificates.
It will be used to generate the intermediate certificates and then hidden away.
Verify certificate
With the help of openssl we can quickly verify our new certificate to make sure everything is correct:
> openssl x509 -in root.pem -noout -text
# Prints something like:
Certificate:
    Data:
        Version: 3 (0x2)
        Serial Number:
            61:c9:5c:9b:c2:28:32:41:3f:83:7d:ea:b8:82:65:0a:a3:ce:32:32
        Signature Algorithm: ecdsa-with-SHA384
        Issuer: C = SE, ST = Skania, L = Lund, O = Jitesoft, CN = Jitesoft CA
        Validity
            Not Before: Jan  9 13:09:00 2023 GMT
            Not After : Jan  9 23:09:00 2028 GMT
        Subject: C = SE, ST = Skania, L = Lund, O = Jitesoft, CN = Jitesoft CA
        Subject Public Key Info:
            Public Key Algorithm: id-ecPublicKey
                Public-Key: (384 bit)
                pub:
                    04:bc:18:70:4e:18:17:eb:4e:82:6e:b6:8f:83:e3:
                    c8:f3:85:27:a4:20:8f:d2:76:4e:38:9e:7b:6c:5f:
                    4f:ef:60:f8:f8:d1:52:a8:b8:b2:f7:a4:94:fa:f0:
                    cc:f9:c4:45:83:d5:52:29:4b:97:75:72:f3:a2:33:
                    ee:d8:e3:84:ae:bd:1b:a1:9a:54:71:9e:6e:1e:cc:
                    3c:83:ad:1d:78:c2:b5:9b:fb:69:52:ec:5c:79:24:
                    fd:48:9c:39:45:9c:22
                ASN1 OID: secp384r1
                NIST CURVE: P-384
        X509v3 extensions:
            X509v3 Key Usage: critical
                Certificate Sign, CRL Sign
            X509v3 Basic Constraints: critical
                CA:TRUE, pathlen:2
            X509v3 Subject Key Identifier:
                72:28:B0:15:F5:62:F9:1D:17:CB:03:40:BB:B7:B8:AD:AA:A3:A4:A7
    Signature Algorithm: ecdsa-with-SHA384
         30:65:02:30:01:dd:5e:42:3e:fb:ef:cc:02:2c:ab:96:2d:06:
         ee:95:fc:c7:22:ba:08:db:5d:b6:57:ba:95:0b:52:64:f7:37:
         a5:c1:17:be:ee:ff:0a:87:35:0b:74:4d:1a:69:f6:21:02:31:
         00:83:3d:01:67:d8:c1:f1:96:96:73:cf:00:6d:b3:60:b2:bf:
         2d:05:e0:2e:ee:f7:09:40:41:c8:71:00:cc:b9:ff:31:d5:3e:
         92:39:11:02:8d:1f:a2:37:a1:09:5f:8e:4e
As you can see, the public key shows the client the allowed functionality of the certificate (X509v3 extensions) as well as the information we supplied in the json file before.
Intermediates
When we have our root certificate we will want to create the intermediate certificates which we will later use to sign our leaf certificates with.
To keep our file structure a bit easier to handle as well as easier to display in a blog, create a subfolder for each new intermediate
to create.
In my case, I’ll create two: Jitesoft Intermediate 1 and Jitesoft Intermediate 2 and call the folders inter1and inter2
to keep it simple.
mkdir inter1 inter2
CFSSL makes use of a profile concept for generation of new sub-certificates. The profiles configuration can be used for all kinds of certificates, while right now, we just create the intermediate profile:
profiles.json
{
    "signing": {
        "profiles": {
            "intermediate": {
                "usages": [
                    "cert sign",
                    "crl sign"
                ],
                "ca_constraint": {
                    "is_ca": true
                },
                "expiry": "43800h"
            }
        }
    }
}
Each profile requires a set of usages, you can as well define an expiry here (which will replace the value set in the config.json file),
and for a Intermediate CA a ca_constraints clause where we set is_ca to true to indicate that it is actually a certificate authority
(which an intermediate certificate is).
For an intermediate authority, we need to se the usages cert sign, crl sign.
The cert sign usage allows the CA to sign certificates and the crl sign will allow the certificate to sign certificate revocations.
The profiles file is used when signing the certificates, and just as with the original ca file, we need a configuration file for the specific intermediates:
inter1/config.json
{
    "CN": "Jitesoft Intermediate 1",
    "key": {
        "algo": "ecdsa",
        "size": 384
    },
    "CA": {
        "expiry": "43800h",
        "pathlen": 1
    },
    "names": [
        {
               "C": "SE",
               "L": "Lund",
               "O": "Jitesoft",
               "ST": "Skania"
        }
    ]
}
With those two files, we can generate the intermediate certificate:
cd inter1
cfssl genkey -initca ./config.json | cfssljson -bare inter1
Inspecting the new intermediate certificate will show an unsigned certificate (which is basically the same as the CA) for a client to recognize that it’s issued by your CA, we need to sign it:
cfssl sign -ca ../root.pem -ca-key ../root-key.pem -profile intermediate --config ../profiles.json inter1.csr | cfssljson -bare inter1
In this case, we make use of the csr file (certificate signing request), because we are actually requesting our certificate authority
to sign the certificate!
If you re-inspect the certificate with openssl, you will now see that the Issuer have switched from the cert itself (Subject)
to the Subject of the CN:
> openssl x509 -in inter1.pem -noout -text

Certificate:
    Data:
        Version: 3 (0x2)
        Serial Number:
            75:74:5e:57:04:c1:06:14:bb:bf:90:3c:93:20:36:bc:0f:38:3a:0d
        Signature Algorithm: ecdsa-with-SHA384
        Issuer: C = SE, ST = Skania, L = Lund, O = Jitesoft, CN = Jitesoft CA
        Validity
            Not Before: Jan  9 13:27:00 2023 GMT
            Not After : Jan  9 14:27:00 2023 GMT
        Subject: C = SE, ST = Skania, L = Lund, O = Jitesoft, CN = Jitesoft Intermediate 1
        Subject Public Key Info:
            Public Key Algorithm: id-ecPublicKey
                Public-Key: (384 bit)
                pub:
                    04:81:4d:6e:ea:b7:0b:c2:b0:80:06:3e:1b:22:9a:
                    84:6f:bc:aa:b5:24:bf:1d:83:4f:70:6f:12:bd:8e:
                    b0:27:cb:e5:7d:a7:8d:f6:da:d3:7d:9e:39:b0:95:
                    07:ae:fa:ad:58:33:72:d5:28:3b:e9:e0:b5:cb:1b:
                    82:2c:30:fa:ce:a7:ab:02:db:1b:a9:1e:15:c8:5a:
                    f8:cc:d2:c8:29:19:07:df:21:89:c6:60:56:b5:bc:
                    08:82:9a:b9:74:ab:5b
                ASN1 OID: secp384r1
                NIST CURVE: P-384
        X509v3 extensions:
            X509v3 Key Usage: critical
                Digital Signature, Key Encipherment, Certificate Sign, CRL Sign
            X509v3 Extended Key Usage:
                TLS Web Server Authentication, TLS Web Client Authentication
            X509v3 Basic Constraints: critical
                CA:TRUE
            X509v3 Subject Key Identifier:
                4A:25:E3:2D:62:83:BA:FF:37:3D:C4:A9:B7:13:00:3A:B4:8D:96:C5
            X509v3 Authority Key Identifier:
                keyid:72:28:B0:15:F5:62:F9:1D:17:CB:03:40:BB:B7:B8:AD:AA:A3:A4:A7
    Signature Algorithm: ecdsa-with-SHA384
         30:64:02:2f:0b:e0:46:e4:af:9f:86:23:35:dd:30:79:cd:af:
         91:81:42:b7:cd:c7:90:d8:16:59:0d:43:b7:59:98:cc:65:6f:
         45:17:74:b2:d9:ca:ef:c6:c8:1b:5e:51:62:fd:6d:02:31:00:
         d5:d2:8c:50:be:37:00:15:31:d2:50:84:29:05:cc:d7:4b:17:
         ef:49:8c:d1:6c:a3:5f:06:d1:b7:7d:b9:09:5b:f3:43:46:3e:
         f4:11:16:80:c1:6a:10:8d:af:5a:91:e0
The same can be done with the inter2 to generate a second intermediate!
Leaf!
The whole reason to have a CA is of course to generate certificates, not just new CA:s, and those certificates
are the leaves.
Just as with the intermediate profile, the leaf certificate needs a profile with the usages that it requires.
So, we can start with creating two types of certificates, one for server auth and one for client auth:
profiles.json
{
    "signing": {
        "profiles": {
            "intermediate": {
                "usages": [
                    "cert sign",
                    "crl sign"
                ],
                "ca_constraint": {
                    "is_ca": true
                },
                "expiry": "43800h"
            },
            "server": {
                "usages": [
                    "server auth"
                ],
                "expiry": "720h"
            },
            "client": {
                "usages": [
                    "client auth"
                ],
                "expiry": "720h"
            }
        }
    }
}
The two new clauses added are the profiles client and server.
In this example, I’ll create a new directory in the inter1 directory to keep the certificate hierarchy and folder structure as is:
mkdir inter1/certs
cd inter1/certs
We also need to create a configuration for the certificates:
inter1/certs/server.json
{
    "CN": "Server",
    "hosts": [
        "127.0.0.1",
        "server.domain",
        "sub.domain.tld"
    ]
}
inter1/certs/client.json
{
    "CN": "Client",
    "hosts": [""]
}
As you see in the two configurations, we set a CN (common name), which - if this was a web certificate - would contain the primary domain of the page the certificate should be used for, and we add a hosts array, which contains a list of the IP-addresses that the certificate will actually be allowed for.
In this case, the certificates will be used for authentication, so the server have the addresses that it will be served on, while the client have an empty list, as we don’t want the certificate to be only used on one host.
To generate the certificates we - again - use the cfssl tool, but in this case without the -initca flag:
cfssl gencert -ca=../inter1.pem -ca-key=../inter1-key.pem \
  -config=../../profiles.json \
  -profile=server server.json | cfssljson -bare server

cfssl gencert -ca=../inter1.pem -ca-key=../inter1-key.pem \
  -config=../../profiles.json \
  -profile=client client.json | cfssljson -bare client
We can now inspect the certificates and see that they are signed with the correct certificate authority (Jitesoft Intermediate 1) that the usages are correct and that the SAN:s are correct:
> openssl x509 -in server.pem -noout -text
Certificate:
    Data:
        Version: 3 (0x2)
        Serial Number:
            07:f9:b7:85:4f:12:a8:10:5c:16:dd:a0:b8:53:80:3c:3c:a4:97:e4
        Signature Algorithm: ecdsa-with-SHA384
        Issuer: C = SE, ST = Skania, L = Lund, O = Jitesoft, CN = Jitesoft Intermediate 1
        Validity
            Not Before: Jan  9 14:10:00 2023 GMT
            Not After : Feb  8 14:10:00 2023 GMT
        Subject: CN = Server
        Subject Public Key Info:
            Public Key Algorithm: id-ecPublicKey
                Public-Key: (256 bit)
                pub:
                    04:52:b6:af:a7:db:dd:0d:2b:0f:ab:d6:49:c7:0e:
                    a8:eb:ef:29:ec:e4:b6:c1:cd:d3:0f:21:f4:5d:a3:
                    b0:ba:c9:b3:11:67:72:20:a7:ec:60:03:76:ec:b0:
                    08:30:14:6e:13:c5:52:66:2b:ec:d2:28:5d:cb:64:
                    a4:06:d9:af:e4
                ASN1 OID: prime256v1
                NIST CURVE: P-256
        X509v3 extensions:
            X509v3 Extended Key Usage:
                TLS Web Server Authentication
            X509v3 Basic Constraints: critical
                CA:FALSE
            X509v3 Subject Key Identifier:
                AA:83:51:38:F4:95:99:79:AB:3F:77:38:AF:77:CC:37:4A:C2:48:82
            X509v3 Authority Key Identifier:
                keyid:8C:D6:B7:3D:9E:0B:9B:5E:68:82:58:EC:91:84:27:89:FB:58:1B:6E
            X509v3 Subject Alternative Name:
                DNS:server.domain, DNS:sub.domain.tld, IP Address:127.0.0.1
    Signature Algorithm: ecdsa-with-SHA384
         30:65:02:30:7f:c4:45:f2:89:75:5d:ba:ec:32:1a:c8:bd:0a:
         78:c5:c3:fa:86:d3:b9:cf:8d:6f:68:54:54:a1:23:5c:73:7d:
         28:41:11:54:61:55:81:bb:03:5f:f0:be:c7:6a:d5:56:02:31:
         00:bd:16:36:5e:2b:f5:1f:31:25:3c:00:bf:7d:86:fc:eb:91:
         09:ae:05:23:31:8e:51:71:81:da:4b:14:1d:b2:95:16:25:8f:
         9f:49:e8:b4:df:c5:08:dc:e9:d6:5d:cf:58
These certificates had a expiry of 720 hours, so they will only be working for a month. This can ofcourse be changed
in the profiles.json file if you want longer certificates!
We can test the chain with openssl and cURL:
# In the `root` directory:
openssl s_server -cert ./inter1/certs/server.pem -key ./inter1/certs/server-key.pem -WWW -port 12345 -CAfile root.pem -verify_return_error -Verify 1
# Open a separate shell and enter the `root` directory:
curl -k --cert ./inter1/certs/client.pem --key ./inter1/certs/client-key.pem https://localhost:12345/test.txt

verify error:num=20:unable to get local issuer certificate
Oh now! This is not good!
This is because openssl (or any other server) can’t verify that the intermediate certificate is actually originating from the root CA. We actually need to bundle the certificates first.
This is done with one of the other tools which is supplied with cfssl, it’s called mkbundle
# in root directory:
mkbundle -f bundle.crt root.pem inter1/inter1.pem
We can cat our new bunlde to see the certificate bundle:
-----BEGIN CERTIFICATE-----
MIICMDCCAbagAwIBAgIUYclcm8IoMkE/g33quIJlCqPOMjIwCgYIKoZIzj0EAwMw
VjELMAkGA1UEBhMCU0UxDzANBgNVBAgTBlNrYW5pYTENMAsGA1UEBxMETHVuZDER
MA8GA1UEChMISml0ZXNvZnQxFDASBgNVBAMTC0ppdGVzb2Z0IENBMB4XDTIzMDEw
OTEzMDkwMFoXDTIzMDEwOTIzMDkwMFowVjELMAkGA1UEBhMCU0UxDzANBgNVBAgT
BlNrYW5pYTENMAsGA1UEBxMETHVuZDERMA8GA1UEChMISml0ZXNvZnQxFDASBgNV
BAMTC0ppdGVzb2Z0IENBMHYwEAYHKoZIzj0CAQYFK4EEACIDYgAEvBhwThgX606C
braPg+PI84UnpCCP0nZOOJ57bF9P72D4+NFSqLiy96SU+vDM+cRFg9VSKUuXdXLz
ojPu2OOErr0boZpUcZ5uHsw8g60deMK1m/tpUuxceST9SJw5RZwio0UwQzAOBgNV
HQ8BAf8EBAMCAQYwEgYDVR0TAQH/BAgwBgEB/wIBAjAdBgNVHQ4EFgQUciiwFfVi
+R0XywNAu7e4raqjpKcwCgYIKoZIzj0EAwMDaAAwZQIwAd1eQj7778wCLKuWLQbu
lfzHIroI2122V7qVC1Jk9zelwRe+7v8KhzULdE0aafYhAjEAgz0BZ9jB8ZaWc88A
bbNgsr8tBeAu7vcJQEHIcQDMuf8x1T6SORECjR+iN6EJX45O
-----END CERTIFICATE-----
-----BEGIN CERTIFICATE-----
MIICWzCCAeCgAwIBAgIUTl02XWipAdn3Y8chGqzegLmrkhAwCgYIKoZIzj0EAwMw
VjELMAkGA1UEBhMCU0UxDzANBgNVBAgTBlNrYW5pYTENMAsGA1UEBxMETHVuZDER
MA8GA1UEChMISml0ZXNvZnQxFDASBgNVBAMTC0ppdGVzb2Z0IENBMB4XDTIzMDEw
OTEzNTYwMFoXDTI4MDEwODEzNTYwMFowYjELMAkGA1UEBhMCU0UxDzANBgNVBAgT
BlNrYW5pYTENMAsGA1UEBxMETHVuZDERMA8GA1UEChMISml0ZXNvZnQxIDAeBgNV
BAMTF0ppdGVzb2Z0IEludGVybWVkaWF0ZSAxMHYwEAYHKoZIzj0CAQYFK4EEACID
YgAEc9LuhhgVEa/Z1CXbYyshJPWjjHNGq8Q88rvU+inxfHCUr/5l10SvwIEaNHiD
FalwWmf/dEtfboPGfI2IaYZZ4A4S8CILK8q90JzpZkPZKpRrdwCSR8BLN3Q7YPVv
Hry0o2MwYTAOBgNVHQ8BAf8EBAMCAQYwDwYDVR0TAQH/BAUwAwEB/zAdBgNVHQ4E
FgQUjNa3PZ4Lm15ogljskYQniftYG24wHwYDVR0jBBgwFoAUciiwFfVi+R0XywNA
u7e4raqjpKcwCgYIKoZIzj0EAwMDaQAwZgIxAPjNCQcRzPsAPudk0PM7I++B/ihk
kqBaVcVtl75Ru0qCr3T85QEZpQQd6xMLAhOe/QIxAPTwercxV4RwPusrvlLHAqI+
bu3IiUngL2bdz+vU1Pk2i8uzi9kWmL8KocVt+sKXWg==
-----END CERTIFICATE-----
This bundle is the CA certificate that is added to any program which requires the CA.
Now, we just need to modify the openssl command to use the ca bundle instead of the root ca:
openssl s_server -cert ./inter1/certs/server.pem -key ./inter1/certs/server-key.pem -WWW -port 12345 -CAfile bundle.crt -verify_return_error -Verify 1
# Open a separate shell and enter the `root` directory:
curl -k --cert ./inter1/certs/client.pem --key ./inter1/certs/client-key.pem https://localhost:12345/test.txt
And we will have a successful response:
depth=2 C = SE, ST = Skania, L = Lund, O = Jitesoft, CN = Jitesoft CA
verify return:1
depth=1 C = SE, ST = Skania, L = Lund, O = Jitesoft, CN = Jitesoft Intermediate 1
verify return:1
depth=0 CN = Client
verify return:1
FILE:file.txt
And that my friend, is how you set up your own certificate authority and chain.
As always, if you find any issues with the tutorial just let me know, and I’ll update it as soon as possible!